- This extension is enabled by default on Fandom.
Interactive Maps is a feature available on Fandom that enables communities to design their own customized maps. It is available to any community that wants to use it.
Getting Started
Map creation and editing is open to all users. You can find the "Interactive Maps" link in the Explore menu of the top navigation, or you can directly navigate to the creation tool by visiting Special:AllMaps on your wiki, where you can create your own Map and find a list of every Map that exists on your community.
All Interactive Maps live in the Map: content namespace, e.g., /wiki/Map:My_New_Map. Maps created in any other namespace, including as a userspace subpage, will not be correctly generated. When creating a Map via the button on Special:AllMaps, this namespace is automatically added, omitting the need to make this part of the page title.
Unless you have set your preferences to use the source editor, the "Edit" button at the top right of any page in the Map namespace will open the visual Interactive Maps Editor, which is a user-friendly option to edit Maps quickly and easily. Clicking "Edit source" from the dropdown menu will instead take you to the source editor and load the base JSON (JavaScript Object Notation) structure for the Map. If you have the source editor selected as your preference, these options are reversed, and the button in the dropdown reads "Edit map". Clicking the pencil icon present on the map itself will always open the visual Interactive Maps Editor, regardless of your preferred editor. While inside the visual Interactive Maps Editor, hovering over the button with the three vertical dots will open a dropdown with the option to "edit source".
Building a Map using Interactive Maps Editor

Interactive Maps Editor
Map Display
This section allows you to view your Map name and upload a Map image as your background.
- Map Name: This is the title of your Map. Your Map will be viewable using the URL
/wiki/Map:My_New_Map, where My New Map is the name that you chose. If you wish to change the name after the Map's creation, hover over the button with the three vertical dots in the top right-hand corner on the Map itself and select the option "move". This will close the Interactive Maps Editor and take you to Special:MovePage. - Map Description (optional): This will add a text description above your Map in the Map namespace to tell viewers as well as Google what this Map is about and how it fits into the context of your wiki. It will also feed future map search results. This field supports wikitext features - like adding images and links, and the character limit is 200. Wikitext features like line breaks and lists don't work.
- Map Image: Click on this area to upload or select the image you would like to use for your Map. The permitted file types are
.jpg,.jpeg,.png, and.svg. The maximum file size is 10 MB. Once uploaded, there is an option to replace the image, but doing so may require you to reposition markers placed on the Map. Note that saving a Map without a background image will result in the loading of a blank page. - Marker Progress Tracking: You can turn this feature on or off on each one of the maps, simply clicking on this button. You can read the Progress tracking section to know more details about this feature.
Categories
Organize markers of a similar kind by grouping them into categories. This list will appear next to the Map and allows you to filter markers by categories.
- Creating categories: Click the "+ Add Category" button to create a new category.
- Renaming categories: Click on the category name to change it.
- Re-ordering categories: Grab hold of the horizontal bars on the right of the category and drag to re-order the categories in the list.
- Deleting categories: Clicking on the category name will transform the horizontal bar into a trashcan icon to give you the option to delete the category.
- Customizing category markers: Click the pin icon on the left of the category to open a menu that allows you to customize how markers are displayed for that category.
- Background color: This will change the color of the marker icon. Click on the colored square to select a color using the color slider or input a hex code in the field to the right.
- Emoji or Character: You may choose to add an emoji or single character as a customization option within category markers. This field has a 1-character limit. After adding an emoji or character, it will be displayed inside the default marker icon in place of the dot in the center. To delete the emoji or character, click the X on the right of the input field.
- Custom icon: Click on this area to upload an image file as a custom icon image for the category, which will replace the default pin icon. The permitted file types are
.jpg,.jpeg,.png, and.svg. The file size for the icon should be between 32x32px and 64x64px. Once uploaded, there is an option to replace or delete each custom icon individually. Know that all markers pins are lined up at the bottom center, regardless of their shape. So if you use a round marker rather than a pin, you'll have to align it yourself at the bottom center and not the middle of the circle. - While the options to either upload a custom icon or use an emoji/character are always enabled, both cannot be active at the same time. In order for the emoji or character to be displayed, you cannot have a custom icon image in use. Uploading an icon image after choosing an emoji will override the emoji and replace it with an image.
Markers
To add a marker to your Map, click the pin icon in the top right-hand corner. Move your cursor to the desired placement on the Map and click to drop it. After you place the marker, a menu will come up with several options that control how your marker will appear on the Map:
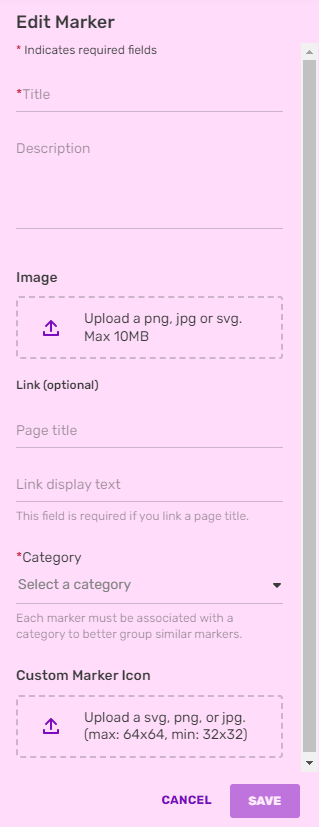
Marker Editor with all its functions
- Title: This is the name of your marker/location. It must be 50 characters or less.
- Description (optional): This description will be displayed under your title in the pop-up window when your marker is clicked on. This field supports wikitext, so all wikitext specific characters will be displayed in standard wikitext format. The description is limited to 300 characters or less, including wikitext characters that will not be shown in the final marker tooltip. You must save your changes to the marker tooltip in order to see your wikitext rendered.
- Image (optional) Click on this area to upload or select an image to use in this marker's popup. The permitted file types are
.jpg,.jpeg,.png, and.svg. The maximum file size is 10 MB. Once added, there is an option to replace the image, or remove it from the marker. The image will be placed under the title and description and above the link. The image is automatically sized to fit inside the pop-up container, at a width of 264px. - Link (optional): You have the option to link to any article on your wiki (perhaps one that gives more detail on the selected marker/location).
- Page title: Put the name of the article you would like to link in this field. It does not matter whether you use spaces or underscores for article names. Do not put the entire URL here, just the page title.
- Link display text: Choose how you would like the link text to be displayed. It could be the same name as the article or something like "See more". This field is required if you link a page title.
- Category: Select which category you would like your marker to be grouped in. Each marker must be associated with a category to better group similar markers.
- Custom Marker Icon: Adds a custom icon to a specific map marker within a category. This overwrites the chosen icon for the category in general. The permitted file types are
.svg,.png, and.jpg, and the icon size should be between 32x32px and 64x64px. Know that all markers pins are lined up at the bottom center, regardless of their shape. So if you use a round marker rather than a pin, you'll have to align it yourself at the bottom center and not the middle of the circle.
Once a marker is created, you can drag it to a different location on the Map if you so choose. You can also click on the marker and hover over the three vertical dots to bring up options to edit or delete the marker.
Additional Functions
Hovering over the button in the top right with the three vertical dots (⋮) will open a dropdown. Depending on your user rights, you will always get the option to "edit source", "history", and "move" the Map.
- Edit source: Clicking this will take you out the visual Interactive Maps Editor and to the JSON code of the Map. If you wish to return to the visual Interactive Maps Editor, you need to exit the source mode and click the edit pencil on the Map again.
- History: This will take you out of the editor and to the page history of the Map, showing you all edits and changes made by anyone and giving you the option to undo them if necessary.
- Move: This will close the Interactive Maps Editor and take you to Special:MovePage, where you can choose a new name for your Map.
The following options are only available to those with the content moderator right or higher.
- Protect: It opens the options for protecting your Map.
- Delete: This will delete your Map. You can always restore it if you did this by accident.
As you are making edits, the preview window will display your changes in real time, so you can see how your Map will look before you save it. When you are finished, click the "Save" button, and your new Map will now appear on the wiki!
Building a Map using JSON in Source Editor
Every Interactive Map is defined in JSON (JavaScript Object Notation). The following fields should be defined in order to generate the Map:
mapImage(required, string) – Name of the file that will be used as the map background image (without the "File:" namespace prefix). The image must be uploaded to the wiki (usingSpecial:Uploador API). The following file extensions are supported:.jpg/.jpeg/.png/.svg. If the file name contains JSON-sensitive symbols, those must be accordingly escaped in the JSON value (e.g.\"or\u0022per RFC 8259).mapBounds(required, array[2][2] of number) – Bounds defining the edges of the map, given as a2x2matrix of numbers.- The first (lower) coordinate defines the minimum point at which marker positions will start (modified by
origin, be it top-left or bottom-left), and the second (upper) coordinate defines the maximum point in the opposite corner (top-right iforiginis "bottom-left", or bottom-right iforiginis "top-left"). A marker at the first coordinate will always be positioned at the origin, which will always be in the top-left/bottom-left corner of the mapImage. - In a typical setup, the lower coordinate is
[0, 0], and the upper coordinate is the size of themapImage, or a size with an equivalent aspect ratio. While the bounds does not limit the resolution of the mapImage, it does affect the perceived minimum and maximum zoom level, as a map with a bounds of[[0, 0], [3840, 2160]], will appear twice the size at same zoom level as a map of an upper bound of[[0, 0], [1920, 1080]]. Scaling the bounds by a non-power-of-two will affect the default zoom and the size of each zoom step. - Bounds may be used to shift the coordinate system so that 0,0 is not the origin, which may be more meaningful for the coordinates on hand. For example if 0,0 should be the center of a map at a size of 1920x1080, mapBounds should be
[[-960, -540], [960, 540]], and all original coordinates that were previously defined in a range of x 0-1920 and y 0-1080 should have half of the width and height subtracted from their x and y position accordingly. - The bounds is also used to define the aspect ratio of the background image, as the image will be stretched and squished to conform to the bounding box (not the other way around). It cannot be used to non-uniformly scale the coordinate system. In order to maintain the aspect ratio, the difference between the pairs of coordinates should always match the aspect ratio of the source mapImage, otherwise the image will appear stretched.
- The first (lower) coordinate defines the minimum point at which marker positions will start (modified by
categories(optional, array of object) – List of categories that will be displayed in the filters list (the dropdown menu found in the top-left of the map).markers(optional, array of object) – List of markers that will be displayed on the map. Each marker must be associated with a defined category.origin(optional, string) – Location of the origin point [0,0] in the coordinate system.- Possible values:
"bottom-left"(default) or"top-left".
- Possible values:
pageCategories(optional, array of string) – Categories to include the map page in. For example,["Foo", "Bar"]will put the map into the categories "Category:Foo" and "Category:Bar".defaultSort(optional, string) – Used to change the default sort key, which influences the position that the map appears in category pages. If not present, the map is sorted using its page name (i.e. without the Map: namespace prefix).description(optional, string) – Add a text description above your Map in the Map namespace to tell viewers as well as Google what this Map is about and how it fits into the context of your wiki. It will also feed future map search results. This field supports some wikitext features like links and images, and the character limit is 200.coordinateOrder(optional, string) – Order of coordinates used in defining map bounds and marker positions.- Possible values:
"xy"(default) or"yx".
- Possible values:
Categories
Categories are a group of markers of the same kind. Each marker category is defined through the following fields:
id(required, string or number) – Uniquely defined ID for each category, matched with thecategoryIdproperty of each marker. Any string is valid as an "id".listId(optional, number) – Category order as shown in the interactive editor and in the filters list.name(required, string) – Name of the category, which will be displayed in the filters list.color(required, string) – The color given to the default marker icon for markers in this category, which can be given in hex colors (3 or 6-digit notation only) or named colors. This field is ignored (but still required) ificonis present.symbol(optional, string) – Add a single Unicode character or an emoji to the center of the default pin. The character may be represented either verbatim (by typing or pasting it into the field), or by using a JavaScript-escaped UTF-16 hex code in the format\u<hex>(see a list of example codes for emojis here. E.g.,\ud83d\ude04to generate 😄).symbolColor(optional*, string) – When choosing a single character, you must specify its color using a hex code (e.g., #FF0000) or color name (e.g., red). Be mindful of accessibility and the contrast with the marker color. Note that when you edit the character later via the Interactive Maps Editor, the character color will automatically change to black or white depending on the marker's background color.icon(optional, string) – Name of the file to be used as the icon of the category (with or without the "File:" namespace prefix), which will replace the default colored pin icon. The file used for the icon should be between 32x32px and 64x64px in size, and the allowed formats are.svg,.png, and.jpg. If present, the fieldscolor,symbol, andsymbolColorare ignored, although thecolorfield still needs to be present and valid.
Markers
Each individual marker is defined through the following fields:
id(required, string or number) – A unique ID for each marker that can be used to link directly to a specific marker.categoryId(required, string or number) – ID of the category associated to the marker. A category definition of this ID must be present in thecategoriesarray.position(required, array[2] of number) – Coordinate position of the marker, within the givenmapBoundsand in the order defined bycoordinateOrder, as an array of two numbers. A marker at the position[0, 0]will be shown at either the bottom-left or the top-left corner of the map, depending on theoriginfield. Note that due to a bug in the validation of this field, you cannot use an X coordinate less than the lower Y coordinate ofmapBounds.icon(optional, string) – Adds a custom icon to a specific map marker within a category. This overrides the chosen icon for the category in general. The permitted file types are.svg,.png, and.jpg, and the icon size should be between 32x32px and 64x64px.popup(required, object) – Properties of the pop-up box that appears when a marker is clicked on:title(required, string) – Title of the marker. Each marker title has a strict 50-character limit.description(optional, string) – Description to be displayed in the pop-up. Each marker description supports wikitext, and has a strict 300-character limit (which applies only to the pre-parsed text). Escaped characters (\n,\",\', etc.) count as a single character.link(optional, object) – Article link to be added to the pop-up. Marker links are optional, but if included, must be defined with both aurl(the article title to be linked to) and alabel(the link text to be displayed). The URL can link to both full articles and article sections. Interwiki links and external links are not supported (but they can be added in the Map Description field).image(optional, string) – File name of the image to be shown in the popup (with or without the "File:" namespace prefix). The image will be placed under the title and description and above the link. The image is automatically sized to fit inside the popup container, at a width of 264px.
Example
{
	"mapImage": "File:MapBackground.jpg",
	"pageCategories": ["Maps"],
	"defaultSort": "",
	"coordinateOrder": "xy",
	"mapBounds": [[0, 0], [1000, 1000]],
	"origin": "bottom-left",
	"categories": [
		{ "id": "1", "name": "Artifacts", "color": "#ff00ff" },
		{ "id": "2", "name": "Dungeons", "color": "#00ff00" }
	],
	"markers": [
		{
			"categoryId": "1",
			"position": [500, 300],
			"popup": {
				"title": "A Sword",
				"description": "Very important artifact",
				"link": {
					"url": "Article about a sword",
					"label": "See more"
				},
                "image": "Example.jpg"
			},
			"id": "1"
		},
		{
			"categoryId": "2",
			"position": [300, 500],
			"popup": {
				"title": "A Cave",
				"description": "Very scary dungeon",
				"link": {
					"url": "Article about a cave",
					"label": "See more"
				}
			},
			"id": "2"
		}
	]
}
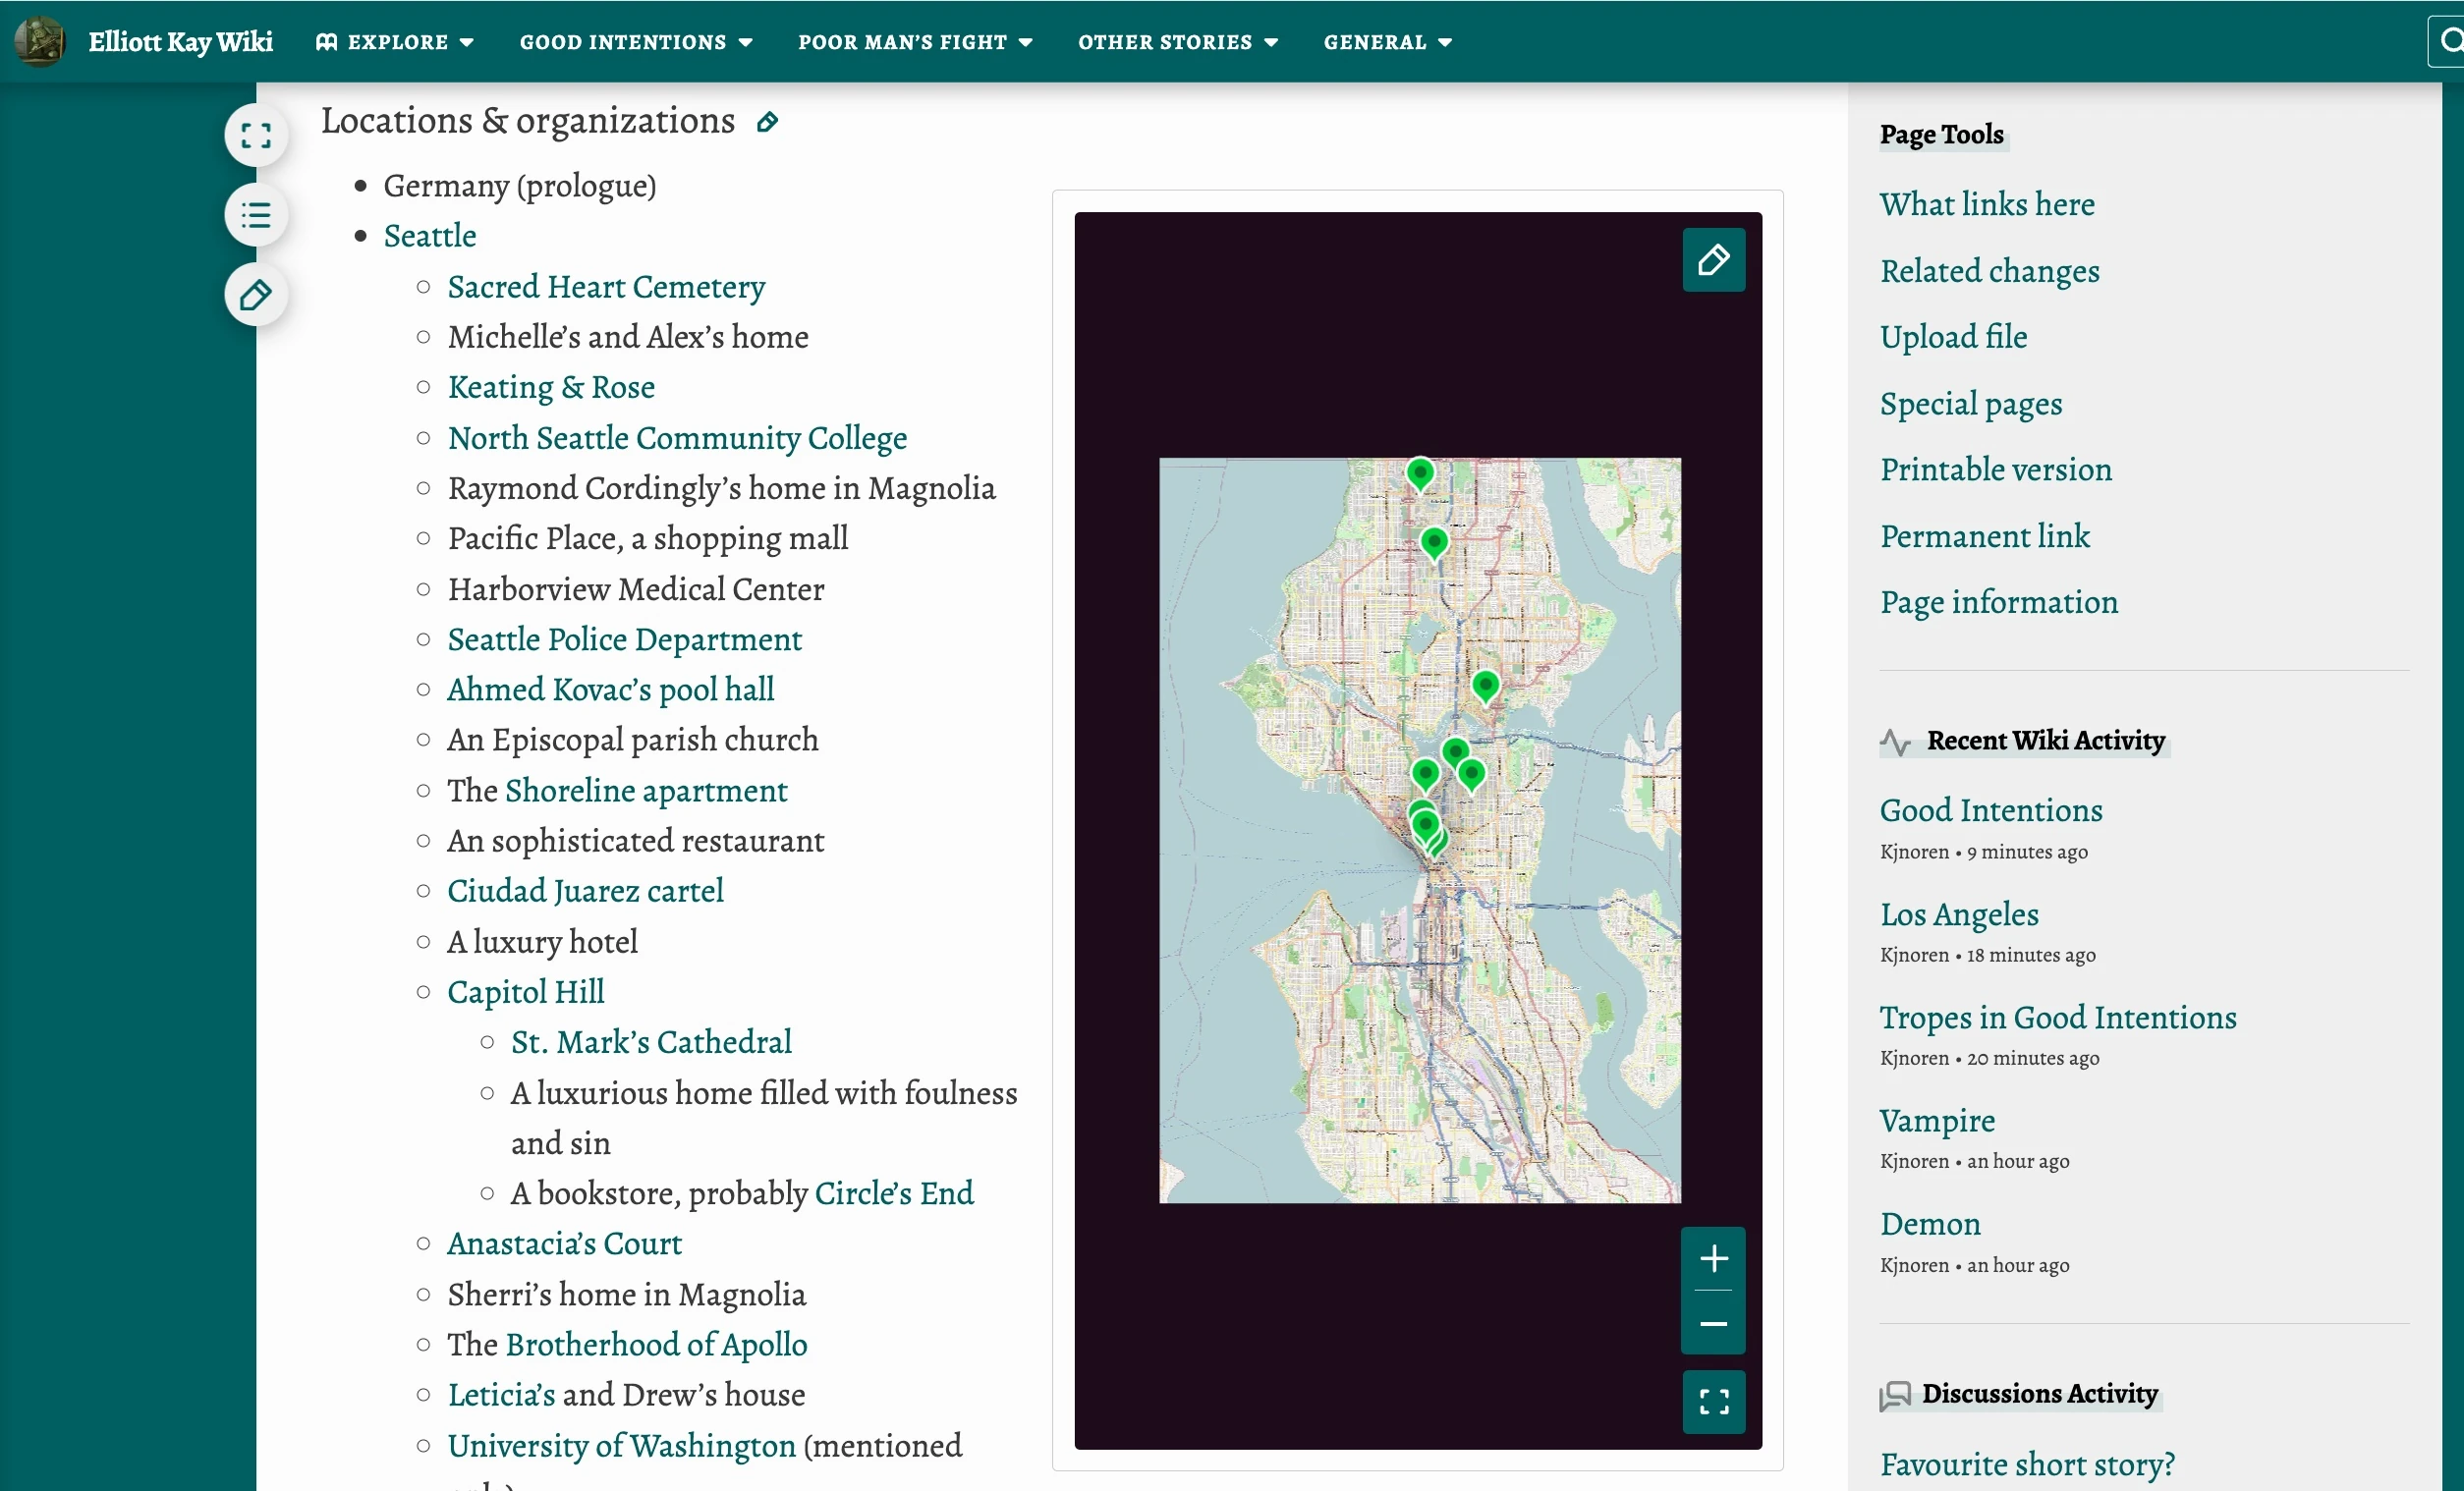
Viewing a Map
Filters
Maps have a filters menu that allows them to show or hide a specific marker category, if you want to see only a specific one. Select "Select all" to show all map markers, or select specific categories to only see markers from that category.
Markers
Markers identify points of interest on the map, and can be selected to display the associated popup.
Markers are created in HTML in the same order in which they were created in the visual editor, or the order in which they are present in the markers array of the JSON. This influences the sort order; the Z-order that markers are displayed in from back-to-front. For example, a marker defined last in the JSON will overlap all other markers that may be surrounding it. It is common practice to sort markers by their Y position, in ascending order (when using an origin of top-left) or descending order (when using an origin of bottom-left), so that markers towards the top of the map are shown behind markers towards the bottom.
The marker order also influences the tab order; the order in which focus is cycled when pressing Tab (↹) and Shift-Tab.
Popups
Popups display more information about the marker, including a title, a description, image, and an optional link pointing to a relevant page. A popup can be shown by clicking on a marker, or pressing the enter/return key if a marker is focused. A popup can be dismissed by clicking anywhere on the map outside of the popup, by clicking on a marker to show a different popup, or by pressing the enter/return key.
Only one popup can be displayed at a time. They appear at the top side of the marker, and if this marker is at the edge of the top side of the map container, the map will be automatically shifted down to be able to display the popup.
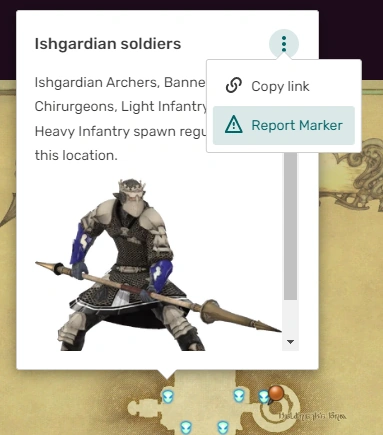
A dropdown menu (⋮) in the corner of the popup can be clicked to display more information:
- Copy link - Copies a link to the marker to the clipboard. When the link is followed, the map will zoom in to bring the marker into focus and will show its associated popup. If the map is embedded in an article, the link to the marker will take you to the map page where it’s placed, not to the article page where its map is embedded. See Linking to Markers for more information.
- Report Marker - Reports the marker. See Reporting Markers for more information.
Tooltips
The tooltips are small text boxes that display the title of the marker. They are shown when you are hovering over its marker on the map. Once you click on a marker, the tooltip disappears and is replaced by the popup, showing the rest of info alongside the title.
They are useful to describe basic info about each one of the markers without further actions. They are available on desktop devices when you have markers on the namespace map, an embedded map on an article page (either using full width or a defined width alongside text or other elements) and also the Interactive Maps Editor.
Tooltips appear at the left or the right side of the marker, and they are automatically placed at one side or the other keeping into account the available space in the content area (if the marker is close to a border, the tooltip will appear at the other side).
Progress tracking
You can also use the map markers to save a related progress from your life. The feature is useful if you have a map with markers showing video game missions or other tasks, a group of episodes from a TV show to watch, locations you want to explore, etc. To save your personal progress, once you click on a marker you will see a checkbox with the text "Mark as complete", and you only need to click this to mark that marker. In addition, if you use the filters menu, it will show you both categories for completed or incomplete markers, alongside the other current categories.

This is an example of a map where the progress tracking feature is enabled.
You can turn the feature on or off on each one of the maps. Once you're on the page for a map (inside the Map namespace) you can click on the Edit button (pencil) to open the Interactive Maps Editor (you can also use ?action=mapedit at the end of the url). At the bottom of the first box (below Map Image) you will see an option called "Marker Progress Tracking", with a button to turn it on.
Alternatively, you can also turn it on using the source editor. Once you're editing the map page (clicking on the edit button or using ?action=edit at the end of the url) you can add the property in JSON with the code ", "markerProgress": true" at the end of the content.
On the other hand, you can also turn the feature off whenever you want. You can go to the Maps Editor and unmark its option, or use the code ""markerProgress": false" if you use the source editor.
If the "Complete/Incomplete" wording is not accurate for your wiki, you are also able to customize the description about complete markers by using the following MediaWiki pages:
MediaWiki:Map-marker-progress-mark-as-complete-marker-popupto change the text on the button to check the markerMediaWiki:Map-marker-progress-completed-marker-popupto change the text once you checked the markerMediaWiki:Map-marker-progress-filter-complete-labelto change the text in the filter menu for checked markersMediaWiki:Map-marker-progress-filter-incomplete-labelto change the text in the filter menu for unchecked markers
Fandom also offers a similar tool to track progress using tables.
Other Features
- Panning: The map can be panned/moved around by clicking and dragging anywhere within the the display area. Either left, middle, or right mouse button can be used. In addition, the arrow keys can be pressed to move the map cardinally in small 80px increments, or in larger 240px increments if the shift key is pressed. When the map is moved too far beyond the edge of the window, or such that a displayed popup is no longer in view, it will automatically snap back into view.
- Zooming: The map can be zoomed in a variety of ways. Performing any momentary zoom action (with the exception of double-clicking and using the scroll wheel) while holding the shift key will zoom the map at a magnitude of 3x. By default each zoom step increases the magnification by ~1.41421306x.
- By clicking the + and - buttons in the bottom right corner, which will zoom into the center of the map.
- By pressing the plus (+) and minus (-) keys on your keyboard, likewise.
- By scrolling with the mouse scroll wheel, which will zoom into the position under the cursor. This is affected by the "lines to scroll at a time" mouse setting in the operating system, at one more zoom step every 4 lines (caps at 8 steps).
- By double clicking (to zoom in) and shift-double clicking (to zoom out), likewise.
- By clicking and dragging the mouse while pressing the shift key, which will zoom the map to a specific rectangular area.
- Fullscreen: The map can be displayed using the full size of the screen device, either for desktop or mobile. There is a button in the bottom right corner for this option (a square represented by its four corners), and clicking on it you will see the map in a larger size using the whole screen area. You can interact with it (zooming, panning, clicking on markers, using filters) in the same way it is originally embedded. To exit from the fullscreen you can click again on the button, but also using the Esc key of your keyboard, and alternatively clicking with the right mouse button to display the menu and click on the “Exit Full Screen” option of your browser.
- Edit: All maps have a pencil icon inside the dropdown menu (⋮) in the top right with the text Edit map. Clicking this button will open the Interactive Maps Editor in a new tab, allowing it to be edited directly.
- Go To Map Page: If you have a map embedded on a page, you have the option to go directly to the page where it was created (in the Map namespace). Using the dropdown menu (⋮), you will see a map icon and the text Go To Map Page.
Maps and SEO
To ensure maximum discoverability and improve the SEO of your custom Maps through Google and other search engines, make sure to utilize the Map Description on each individual Map to its fullest potential. By adding a text description above your Map in the Map namespace, you can tell viewers as well as the search engine crawlers what this specific Map is about and how it fits into the context of your wiki. This field supports wikitext, and the character limit is 200.
In addition to adding descriptions to individual Maps, the Special:AllMaps page has a generic description that you can also customize to be more specific to your wiki. To do this, contact Fandom Staff to change MediaWiki:All-maps-dashboard-description for you with the desired text.
Embedding a Map
To get more eyes on your Map, you can embed it into a mainspace article if you wish. Once the Map has been created, it can be transcluded into an article using the {{Map:My New Map}} wikitext syntax.
Like templates, more than one Map can be embedded in an article.
Aligning and Placement
Embedding a map in an article using the {{Map:My New Map}} wikitext syntax will add it using 100% of the width embed and with a fixed height. For the desktop experience, you can use HTML attributes and adjust it at your convenience.
The required HTML syntax is <interactive-map name="MAP_NAME" />, and additionally you can include the following attributes:
In this example, the map is integrated next to a text column to optimize the full width of the content area.
- If you want to set a concrete width and or height to the embedded map, you can use the properties
widthandheight. Width can be set either using pixels (width="000px") or using a concrete percentage (width="000%"), having a minimum width of 250px and a maximum percentage of 100%. Height can be only set using pixels (height="000px") with a minimum of 200px. These options are available for desktop devices above 1280px. Otherwise, the maps will be using 100% of the width. On mobile devices the maximum height and height are 50% of the viewport. - Similar to the image or video behavior, the width size you set defines the width of the whole map container, not only the map image. In addition, you have to keep into account the embed also add some spacing alongside the text or other elements (image, video, another map). The extra spacing doesn't allow to place 2 single maps in the same line defining 50% of the width of the page for each one of them, or 3 maps using 33%, but you would need to define less percentage.
- To align it to the right or to the left, you can use the properties
leftorright. If you don't add a concrete size to the map, it will be aligned to the left or to the right to 50% of the width, similar to the image behavior. For instance, if you want to combine these two options, you can use a code similar to<interactive-map name="MAP_NAME" left width="300px"/>but adapted to your map and desired use. - If you want to hide the filters button, you can use the
hide-filtersproperty. The button showing its menu will be hidden if the map is embedded, and the user can only see it using the fullscreen option. - You can use captions on embedded maps, in the same way we currently use it with images. You can add the property
captionwith the formatcaption="CAPTION_TEXT", and even format the text using wikitext (bold, italics, links) on both desktop and mobile skins. - You are able to embed a map with a focused concrete marker, hiding the rest of them and also unselecting all the categories. Once you have the marker ID (the easiest way is clicking on it and later in its menu - using the 3 dots icon - to use the "Copy link" option and know the ID number) you can use the code
marker="MARKER_ID". - In the same way, you are able to embed a map with a selected category or more than one. Once you have the category ID or IDs (you can get them from the source mode editor, searching it in the map page code), you can use the code
categories="CATEGORY_ID"to show the map only making this category visible (including all its markers) but hiding the rest of them by default. You can later select more categories using the filters menu. If you want to show more than one category, you can write a list of them using the codecategories="CATEGORY_ID_1;CATEGORY_ID_2"(for instance,categories="1;3"). In the same way, if you want to embed a map without markers, you can do it by keeping the categories field empty (categories="").
If you are embedding a map and its embed size is 300x300px or smaller, the embedding will hide the tool buttons (zoom, edit) except for the fullscreen button. If you click on it and see the map using the fullscreen, these buttons will be available to use. The same behavior is displayed on mobile devices by default, regardless of the embedding size.
Also for these small sizes, if you are clicking on a marker, its popup will be shown in fullscreen mode after activating it once you click on the marker. If you only hover over the marker, the map will show you a small tooltip with the title.
Linking to Markers
Map markers can be directly linked to by including the URL query parameter marker=marker_id in an external link to the map, where marker_id is the ID of the marker that should be displayed.
As an example, on the Avatar Wiki, the following link will link to a marker with the ID 42 on the Avatar world map: https://avatar.fandom.com/wiki/Map:Avatar_world_map?marker=42. This can be generated in wikitext using the fullurl magic word. For example:
{{fullurl:Map:Avatar world map|marker=42}}→ https://avatar.fandom.com/wiki/Map:Avatar_world_map?marker=42[{{fullurl:Map:Avatar world map|marker=42}} Jang Hui]→ Jang Hui
Reporting Markers
Report option for logged-in users
Logged-in users can report a marker by clicking the three vertical dots (⋮) on the marker pop-up and selecting the "Report Marker" button. A successful report is indicated by a banner notification in the bottom left corner, and the "Report Marker" option in the menu will change to "Already Reported". This is only visible to the user who reported that marker. A previously dismissed marker cannot be reported again by the same user as long as the reports have not been cleared from Special:Reports. Trying this will result in the error message "There was a problem reporting this marker. Please try again."
Anonymous users cannot report a marker at all. While they see the "Report Marker" option, clicking that results in a pop-up prompting them to create an account.
If you wish to report a Map for deletion, you can do so by directly adding the relevant deletion category that your wiki uses to the Map. You can do that via the category module at the bottom of the page or by adding/updating the "pageCategories" in the JSON editor with the category name.
Reviewing Reports
Only administrators and content moderators will see any visible indicators that a marker has been reported and have the ability to address marker reports. The following moderation tools and report indicators will be available to them:
Special:Reports
Reported markers will appear on Special:Reports. This page can be found as a separate tab on Recent Changes, titled Map Reports, after the Image Activity tab. Anyone able to edit a Map can edit or even delete a reported marker, but only a saved edit or the deletion of the Map by a moderator will dismiss the report. Dismissed reports will remain visible (but grayed out) on this feed though will disappear after some time, depending on how much marker reporting activity the wiki sees. Active reports are visible indefinitely.
Viewing reported markers on Special:Reports, a moderator has the following options:
- Review: Clicking this will take you to the Map in the Map namespace with the marker tooltip automatically opened. If the reported marker has been deleted in the meantime, you will just be taken to the Map, which should be an indicator for you to check the Map's history for marker deletion. The report for a deleted marker can only be removed by clicking "dismiss" on
Special:Reports. - Dismiss: Dismissing a report from
Special:Reportswill gray out that entry and simultaneously dismiss all reports for that marker in case it was reported multiple times. You can still click on the title of the marker to be taken to the Map and have the tooltip open directly.
While Viewing a Map
When viewing a Map as a moderator, the following elements indicate that a marker has been reported:
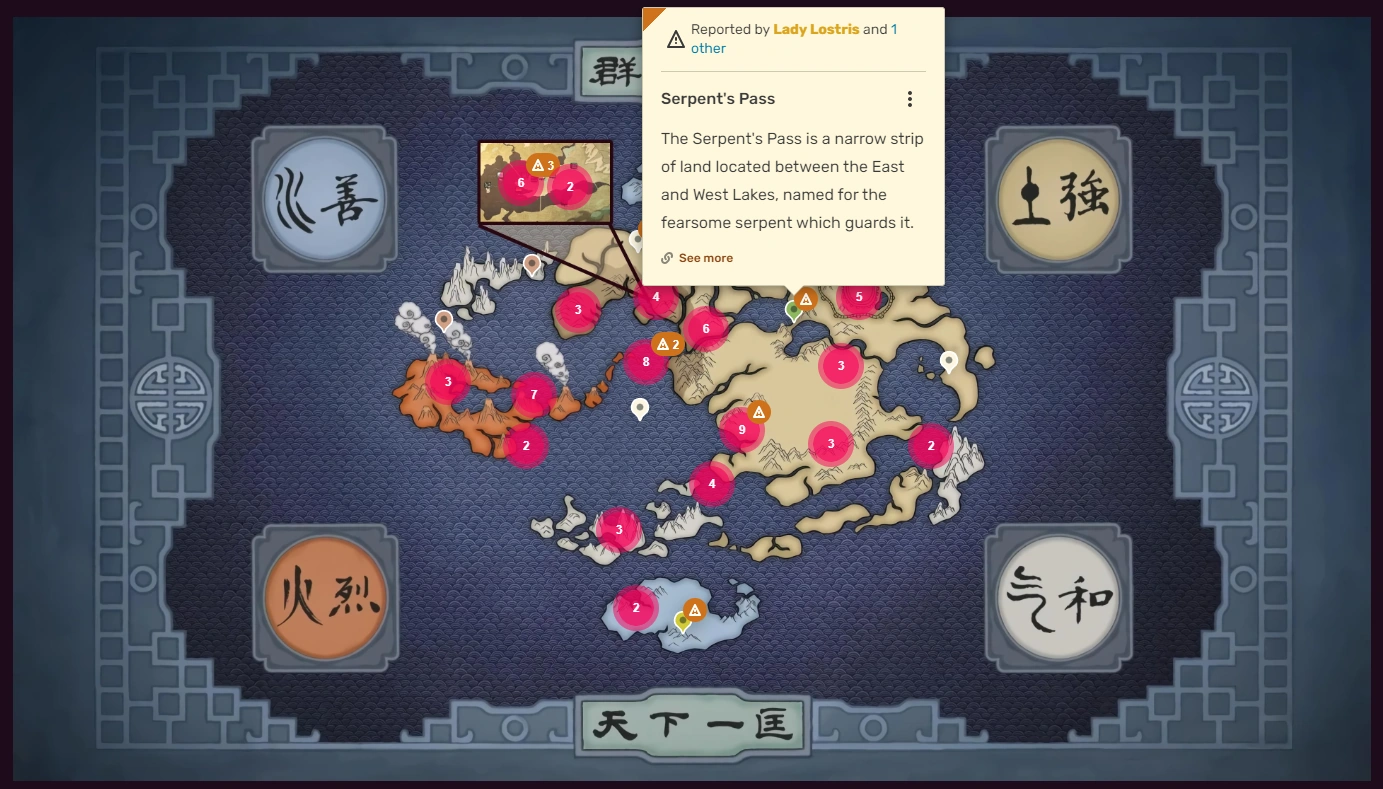
Reported pins are visually marked to moderators.
- There will be an icon next to a marker.
- When opening a marker tooltip, there will be a bar message at the top saying "Reported by <Username>" or "Reported by <Username> and <number> others." Clicking on the username will take you to the reporter's profile page.
- When accessing the marker menu via the three vertical dots (⋮) on a marker with active reports, there will be an option to "Dismiss Report" rather than "Report Marker".
- After clicking "Dismiss Report" from the marker menu, a banner notification in the bottom left corner will indicate a successful dismissal, and the indicator and tooltip bar message will disappear.
Visual Interactive Maps Editor
When a moderator opens the visual Interactive Maps Editor, the report icons will remain visible next to the reported markers. When editing the Map via the JSON editor, there are no indications of which marker has been reported, and the moderator will have to search for the marker based on the marker's title.
Useful links
- First announcement of Interactive Maps
- 2022 update for Interactive Maps
- Full launch of Interactive Maps
- A blog with notes about updates made to Maps
- A blog post about the release of the progress tracking feature
- A blog post about the release of new ways to embed maps
- A blog post about the implementation of the performance improvements
Map examples
- Avatar Wiki: One of the first maps created using Interactive Maps
- Escape from Tarkov Wiki: Highly customized maps, showing what's possible beyond the standard
- Forgotten Realms Wiki: An extremely detailed map with over 3,600 markers, pushing the limits of what's possible with Maps
- Need for Speed Wiki: An example of one of the first communities to make use of custom markers and map descriptions
- Pillars of Eternity Wiki: Over 200 comprehensive maps
- Starlancer Wiki: An unorthodox use of Maps to create a starship diagram
- Warriors Wiki: Another interesting use of maps as a timeline for a series of books
- Addams Family Wiki: An example of Family Tree maps
See also
- Help:Interactive Maps/Advanced, explaining more actions related to maps.
- Help:ImageMap, a default MediaWiki extension for embedding maps based on image coordinates.
- Help:Maps Extension, a default MediaWiki extension for embedding real-world maps.
Further help and feedback
- Browse and search other help pages at Help:Contents
- Check Fandom Community Central for sources of further help and support
- Check Contacting Fandom for how to report any errors or unclear steps in this article
- Ask for help and give feedback on Interactive Maps in the #maps channel of the official Fandom Discord.